Hexo + Butterfly主题美化
搭建时是Hexo + Next主题,Next主题比较简约直观,本打算就直接用Next,但之后发现了Butterfly主题也很好看,就配置了Butterfly主题
Next主题:https://theme-next.js.org/,https://github.com/theme-next/hexo-theme-next
Butterfly主题:https://github.com/jerryc127/hexo-theme-butterfly
1. 文章加密
利用 hexo-blog-encrypt 实现文章加密,安装命令:
1 | npm install --save hexo-blog-encrypt |
然后在文章的开头部分加入 password, abstract等,例如:
1 | --- |
但是有个问题就是加密后,主页文章预览会显示一串乱码,暂时不知如何解决。
2. 主页Subtitle打字效果
默认没有启用,在主题下的_config.yml中将enable设置为true:
1 | subtitle: |
显示文字要以-加空格开头,可显示多行。但是实际操作中,在打开打字效果时,就完全不显示subtitle,查阅了butterfly github 中的 issues 记录,可能的原因是 subtitle 用的typed.js的cdnjs 没有更新,所以获取不到,可以手动添加上CDN,在 typed.js中找到CDN:
1 | <script src="https://unpkg.com/typed.js@2.0.16/dist/typed.umd.js"></script> |
复制中间的网址,打开themes下的_config.yml,拉到最下面,取消注释typed,并填入网址:
1 | option: |
3. 文章结尾版权信息
默认文章结尾的版权信息中虽然文章作者是对的,但是作者跳转的链接以及文章链接都是是一个例子网站,修改themes下的_config.yml中的post_copyright:
1 | post_copyright: |
改完后发现文章链接的地址开头还是example,还需要修改根目录下_config.yml中的url为我的仓库地址。
4. 文章页面以及侧边栏卡片颜色及透明度设置
为配合背景图片以及Head图片,可设置文章页面以及侧边栏卡片颜色及透明度,基本参考https://zhuanlan.zhihu.com/p/582638450 ,用博文里的代码只实现了背景图片的设置,其他均没有其作用,通过大量搜索和查阅代码,一点一点搞好了。
步骤如下:
在根目录下的
source文件夹下建一个我自己的文件夹,并在下面建立CSS文件夹,新建myStyle.css文件,这里文件不放在butterfly主题下是防止主题更新覆盖掉,并且顺手把主题下的img文件夹以里面的图片也迁到根目录source下。在
myStyle.css写入如下代码:1
2
3
4
5
6
7
8
9
10
11
12
13
14
15
16
17
18
19
20
21
22
23
24
25
26
27
28
29
30
31
32
33
34
35
36
37
38
39
40
41
42
43
44
45
46
47
48
49
50
51
52
53
54
55
56
57
58
59
60
61
62
63
64
65
66
67
68
69
70
71
72
73
74
75
76
77
78
79
80
81
82
83
84
85
86
87
88
89
90
91
92
93
94
95
96
97
98
99
100
101
102
103
104
105
106#web_bg {
background-image: url("../img/banner.jpg"),
linear-gradient(60deg, rgba(255, 165, 150, 0.5) 5%, rgba(0, 228, 255, 0.35))
}
#post_bg {
background-image: url("../img/banner.jpg"),
linear-gradient(60deg, rgba(255, 165, 150, 0.5) 5%, rgba(0, 228, 255, 0.35))
}
/* 侧边栏个人信息卡片动态渐变色 */
#aside-content>.card-widget.card-info{
background: linear-gradient(-45deg, rgba(225,235,255,.6),
rgba(225,235,255,.9),
rgba(225,235,255,.9),
rgba(225,235,255,.6));
}
[data-theme=dark] #aside-content>.card-widget.card-info {
background: linear-gradient(-45deg, rgba(24,40,72,.2),
rgba(35,37,58,.9),
rgba(35,37,58,.9),
rgba(24,40,72,.2));
}
/* 侧边栏公告栏卡片渐变色 */
#aside-content>.card-widget.card-announcement{
background: linear-gradient(-45deg, rgba(225,235,255,.6),
rgba(225,235,255,.9),
rgba(225,235,255,.9),
rgba(225,235,255,.6));
}
[data-theme=dark] #aside-content>.card-widget.card-announcement{
background: linear-gradient(-45deg, rgba(24,40,72,.2),
rgba(35,37,58,.9),
rgba(35,37,58,.9),
rgba(24,40,72,.2));
}
/* 侧边栏目录最新文章卡片渐变色 */
#aside-content>.sticky_layout>.card-widget{
background: linear-gradient(-45deg, rgba(225,235,255,.6),
rgba(225,235,255,.9),
rgba(225,235,255,.9),
rgba(225,235,255,.6));
}
[data-theme=dark] #aside-content>.sticky_layout>.card-widget{
background: linear-gradient(-45deg, rgba(24,40,72,.2),
rgba(35,37,58,.9),
rgba(35,37,58,.9),
rgba(24,40,72,.2));
}
/* 个人信息Follow me按钮 */
#aside-content>.card-widget.card-info>#card-info-btn {
background-color: #3eb8be;
border-radius: 8px;
}
/*文章页面*/
.layout>#post {
background: linear-gradient(-45deg, rgba(225,235,255,.8),
rgba(225,235,255,.9),
rgba(225,235,255,.9),
rgba(225,235,255,.8));
}
[data-theme=dark] .layout>#post {
background: linear-gradient(-45deg, rgba(24,40,72,.2),
rgba(35,37,58,.9),
rgba(35,37,58,.9),
rgba(24,40,72,.2));
}
/*主页文章预览页面*/
#recent-posts>.recent-post-item{
background: linear-gradient(-45deg, rgba(225,235,255,.8),
rgba(225,235,255,.9),
rgba(225,235,255,.9),
rgba(225,235,255,.8));
}
[data-theme=dark] #recent-posts>.recent-post-item{
background: linear-gradient(-45deg, rgba(24,40,72,.2),
rgba(35,37,58,.9),
rgba(35,37,58,.9),
rgba(24,40,72,.2));
}
/*分类页面*/
.layout>#page {
background: linear-gradient(-45deg, rgba(225,235,255,.8),
rgba(225,235,255,.9),
rgba(225,235,255,.9),
rgba(225,235,255,.8));
}
[data-theme=dark] .layout>#page {
background: linear-gradient(-45deg, rgba(24,40,72,.2),
rgba(35,37,58,.9),
rgba(35,37,58,.9),
rgba(24,40,72,.2));
}
/*时间轴页面*/
.layout>#archive {
background: linear-gradient(-45deg, rgba(225,235,255,.8),
rgba(225,235,255,.9),
rgba(225,235,255,.9),
rgba(225,235,255,.8));
}
[data-theme=dark] .layout>#archive {
background: linear-gradient(-45deg, rgba(24,40,72,.2),
rgba(35,37,58,.9),
rgba(35,37,58,.9),
rgba(24,40,72,.2));
}其中每个页面的名称可通过在网页按F12查看,
background: linear-gradient(渐变方向,颜色)是用来设置渐变颜色的页面,可使用十六进制颜色码,可在uigradient查看颜色代码甚至CSS代码,我这里为了设置透明效果,需要使用rgba颜色值,在https://www.sioe.cn/yingyong/yanse-rgb-16/ 上可方便转换。在themes下的
_config.yml里的inject下引用myStyle.css:1
2
3inject:
head:
- <link rel="stylesheet" href="/self/css/myStyle.css">
中间其实一部分代码没什么问题,却一直不起作用,无意中删除了前后的一些空行或者空格,发现居然管用了,突然感觉估计是代码缩进的问题,因为我是直接用记事本打开的.css文件,之后记着还是用Pycharm打开吧。
5. 字体颜色
Butterfly主题是自带浅色和深色模式切换的,在浅色模式下,由于之前配置了页面透明度,感觉字看不太清,所以决定把页面改为和深色模式一样,除了修改页面颜色外,还需把字体颜色改为白色,这里直接改了全局foot颜色,在主题下的source-css-var.styl文件里,修改:
1 | $font-color = #FFFFFF //#1F2D3D |
1 | $font-black = #FFFFFF //#4C4948 |
侧边栏目录标题颜色修改:
1 | $toc-link-color = #ffffff #666261 |
这样,深色模式切换时就只是背景和整体的亮度变暗。
6. 添加看板娘
官方有提供live2d,这里想配置加强版看板娘,需先卸载原始live2d:
1
npm uninstall hexo-helper-live2d
项目下载地址:live2d-widget, 解压到
themes\butterfly\source\文件夹下,记得删除文件夹名后缀-master打开
live2d-widget下的autoload.js文件,将live2d_path设为自己的路径,一般就是注释掉网址,取消/live2d-widget/的注释。打开
butterfly-layout-includes目录,点击修改head.pug文件,在文件末尾粘贴:1
script(src='/live2d-widget/autoload.js')
最后在主题配置文件下即butterfly下的_config.yml中开启看板娘:
1
2
3# 看板娘
live2d:
enable: true
下面是一些自定义配置:
- 修改首次加载的模型:
live2d-widget-src-index.js中:
1 | (function initModel() { |
live2d-widget文件夹下的waifu-tips.js中:
- 修改看板娘的位置:其中人物距离底部的位置
margin-bottom
1 | #waifu { |
- 人物大小
1 | #live2d { |
- 按钮位置
1 | #waifu-tool { |
- 按钮间距
1 | #waifu-tool span { |
- 按钮大小
1 | #waifu-tool svg { |
7. 主页文章封面
主题下的_config.yml里,cover改为true开启文章封面功能:
1 | cover: |
每篇文章单独设置封面,需要在文章里Fort-matter里添加cover,后面跟封面图片地址,可以是网址和相对路径:
1 | cover: https://lxmusic.toside.cn/img/logo.svg |
这里相对路径是根目录下source里我自己建立的self文件夹下存放的图片。
8. 评论系统
修改主题下_config.yml文件:
1 | comments: |
这里启用了Valine,参考Valine 进行配置。其他评论系统可参考https://blog.csdn.net/qq_38157825/article/details/112783083
9. 搜索
我这里之开启了本地搜索local_search,按照butterfly说明文档,安装hexo-generator-searchdb:
1 | npm install hexo-generator-searchdb |
修改主题配置文件:
1 | local_search: |
配置完成后网站右上角首页旁边会出现搜索按钮:

默认搜索页面背景是白色的,由于我之前把字体都改成了亮色,这里看不清,在主题下source-css-var.styl文件加下修改搜索背景颜色为暗色:
1 | $search-bg = #25253A //#f6f8fa |
10. 设置图床
本来打算使用Gitee仓库作为图床,因为国内可以访问,但是配置完发现不显示,查询后才知道Gitee 开启了防盗链,所以还是使用Github仓库 + Picgo + jsDelivr CDN的方案:
- 新建一个Github的公共仓库作为图床,并在
Github - Settings - Personal access tokens中生成token。 - 下载PicGo ,安装,打开Picgo,点击图床设置,选择Github图床,填写如下信息。
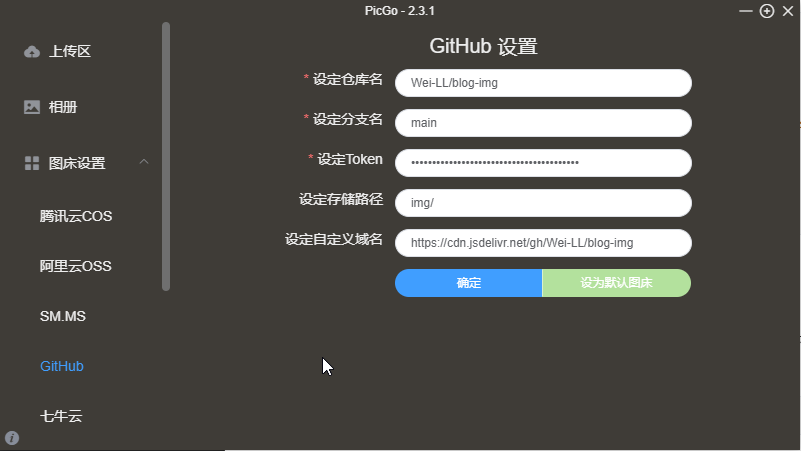
自定义域名填写:https://cdn.jsdelivr.net/gh/用户名/仓库名, 采用jsDelivr CDN进行加速。
- 配置Typora,在偏好设置,图像里设置PicGo:
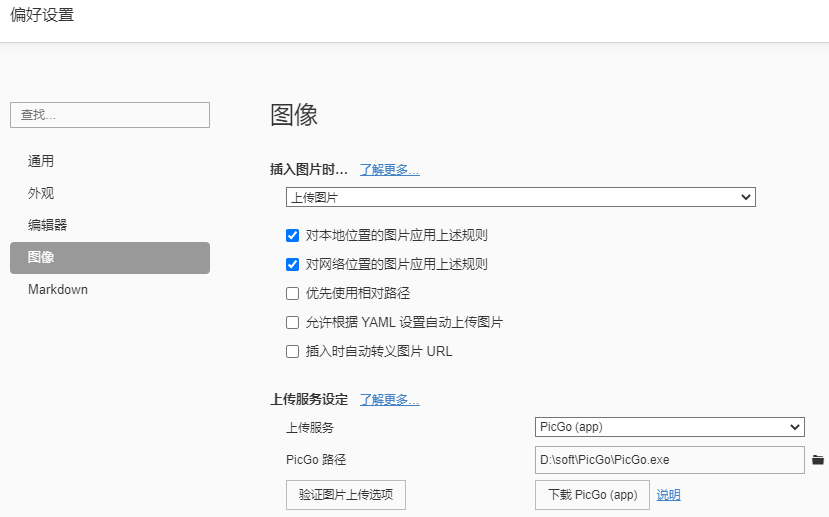
之后文章中的图片只需要粘贴进去就会自动上传。
11. 背景特效
Butterfly自带三个背景特效:canvas_ribbon (靜止彩帶背景), Fluttering Ribbon (動態彩帶) 和 canvas_nest,只需要在主题下_config.yml将相应的enable设置为true即可。
1 | # canvas_ribbon (靜止彩帶背景) |
12. 其他颜色修改
主页文章标题选中颜色
/butterfly/source/css/_page/ 目录下的 homepage.styl 文件,修改以下代码:
1 | & > .article-title |
文章页面链接选中颜色
/butterfly/source/css/_global/ 目录下的 index.sty 文件,修改以下代码:
1 | button |
分类页颜色
分类页左侧圈圈颜色:
/butterfly/source/css/_global/ 目录下的 function.styl 文件,修改以下代码:
1 | .list-beauty |
分类页词条选中颜色:
/butterfly/source/css/_page/目录下的 categories.styl 文件,修改以下代码
1 | .category-list |
归档页颜色
/butterfly/source/css/_page/ 目录下的 archives.styl 文件,修改以下代码:
文章总览左侧圈圈:
1 | &-title |
文章左侧圈圈:
1 | &-item |
鼠标选中文字变成的颜色:
1 | &-item |